We'll cover the creation of manual blocks in eZ Flow and eZ Publish, so stick around if you'd like to brush up on your knowledge.
You have probably already wondered what eZ Flow is about. Maybe you have already familiarized yourself with the concept of zones and blocks and know when it is used. Maybe you have even put together a layout or two, or created a block. Nevertheless, in this article we will cover the main concepts of zones and blocks, and the basic examples of creating manual blocks in our eZ Publish environment which we have learned to use and love. The dynamic blocks should be covered in one of the upcoming articles.
What’s the big deal?
If you look at the official documentation on eZ Flow (which can be found here) the first sentence seems awfully complicated, but in essence it explains the pure awesomeness of this fine extension:
doc.ez.noeZ Flow is an extension to eZ Publish that has extended functionality for handling the flow of content publication over time, specifically the rotation and placement of content on front pages.
This means that, when you develop a site with eZ Flow, you don’t just have a site anymore. You have a full-blown portal.
For example, your client owns a TV-news cable company. In addition to all of the news the client covers in their broadcast, they still have additional news to be placed on their site, and a team of editors which will fill up their portions of the site. They all work constantly and at the same time, so they cannot edit what will show on the landing page at the same time. That’s where eZ Flow kicks in. If you’ve set up your blocks properly, the news which the editors put in different sections of the site are going to show up on the landing page. In that way, you can create a site which is relevant, happening and exactly what your client wants. And after a while, that news can jump to another portion of the landing page, which will display the non-essential stuff, and their place will take up some other breaking news. That is exactly what rotation and placement of content means.
Of course, to continue with the setting up of the blocks described in the article, you will need to have the eZ Flow extension installed. Since the eZ Flow extension has a huge impact on the whole infrastructure of your eZ Publish installation, it comes as a stand-alone package when installing eZ Publish for the first time. Also, it introduces a whole new datatype called Layout which is essential for work with eZ Flow. The layout datatype basically enables you to divide your screen into zones. In order for it to work properly, it needs to be added to the content class where you want your layout to appear (for example Frontpage or Landing page, or even Article if you want to use it that way).
Also, in order for eZ Flow to do its magic, you will need to enable the cronjobs for eZ Flow on your system. Now, the whole frequency of the cronjobs is up to you, but it should be based on how often you intend to change the content of your landing pages.
eZ Flow main concepts: zone and block
The main layout of a landing page made with eZ Flow is divided into zones, which have segments called blocks. As far as zones are concerned, out of the box, you have five layouts predefined for you, and those five layouts are actually a pretty wide array of choices for a portal, so we’ll skip the creation of a zone for now. But I will make sure to cover it in some of the future articles. It is enough to describe a zone as an area on the screen where content is displayed based on any criteria you choose. For example, you can have a zone which displays only the breaking news from different editors, and then a zone which displays only the commercial content, etc. This way, the end-user gets to focus on what you want him/her to focus on.
The main building blocks of a zone are, well, blocks. Basically, when deciding how to populate your landing page with some content in eZ Flow, you need to first decide on a layout and then put some blocks into each zone. And these blocks determine what will be shown on the landing page, or any page with zones for that matter.
Setting up a manual block
The blocks can be dynamic or manual. A dynamic block is filled up automatically and it’s used mainly when you have the need to periodically dynamically display some content based on some rules you define. A manual block is not changed until the editor of the site changes it, that is, manually adds or removes items.
Setting up a manual block in eZ Flow is actually the easier part of dealing with blocks. To set up manual blocks, you need to open the block.ini.append.php in the settings folder of your extension. You'll notice we didn't put the block.ini.append.php file in any of the siteaccess settings because it is used in all of the siteaccesses simultaneously. So, go to extension/myextension/settings and create a block.ini.append.php file here. The settings for the block are pretty simple:
[General]
AllowedTypes[]=myblock

[myblock]
Name=My Block
NumberOfValidItems=5
NumberOfArchivedItems=3
ManualAddingOfItems=enabled
ViewList[]=default
ViewName[default]=Default New Block
Right now, we have defined that we wish to use the new block called myblock on the site, that is, on the layouts we use. After that, we have defined that block in its own separate settings section in the block.ini which we have named myblock. This is a naming convention for the block sections which needs to be used in order to set up manual blocks properly. Everything in the myblock section is pretty self-evident, but let’s run through it all the same.
Name - Name of the block which will be displayed in the administration
NumberOfValidItems - defines how many items the block will display
NumberOfArchivedItems - defines how many items will be archived in the block
ManualAddingOfItems - this is a trigger used to define if the block is manual or not so, either “enabled” or “disabled” goes in here
ViewList[] - this is an array containing a list of views for the block; there can be more than one view used on the site (for example, a left menu view and a footer view)
ViewName[default] - this is the name of the view displayed in the administration; in order to tell eZ Flow which name to display for what view, we need to add the view identifier (in our case “default”) into the square brackets
After the main block settings, we need to do a few more things in order to truly display our block in the frontpage. First off, we need to define its override in the main siteaccess. So, if, for example, you have a siteaccess called eng, open the override.ini.append.php file in your extension’s folder (extension/myextension/settings/siteaccess/eng/override.ini.append.php) and input the override view settings for your block like so:
[block_myblock_default]
Source=block/view/view.tpl
MatchFile=block/myblock_default.tpl
Subdir=templates
Match[type]=myblock
Match[view]=default
So, we have defined the override settings for the default view in the myblock block. Now, we need to create our template. Go to extension/myextension/design/mydesign/override/templates/block/ and create a template called myblock_default.tpl here. And, to display something, let’s just put some code in there, shall we?
{def $valid_nodes = $block.valid_nodes}

{foreach $valid_nodes as $valid_node}
    {node_view_gui view=’block_item’ content_node=$valid_node}
{/foreach}

{undef $valid_nodes}
As you can see, a block template differs a bit from the node template in that it has a $block variable already defined in the similar manner as a node template has the $node variable defined. The $block variable contains all of the block parameters we need. Since we needed only the valid nodes, that is, the nodes which will be manually added to the block, we will display only them. Also, a new view called block_item will be used here, so it should be created for the classes we intend to put in our block.
After you clear all the caches, the changes should take effect, and you will be able to add the new block into the layout, fill it up with some nodes, and, if your zone is set up correctly, the block should be displayed on the page with your layout.
Adding content
There are two ways to add some content to your block. The more common way is using the edit view of the landing page. It looks something like this:
As you can see, we currently have the Right zone selected in this layout, and two blocks in the Right zone: Campaign and Content Grid. The Content Grid is a manual block which is set up in the same way I described earlier. There are already 4 nodes added to the block. And when you click on the “Add item” button, the Browse view opens and you can select the nodes you want to add to the block. This is the most common way of adding content to a block.
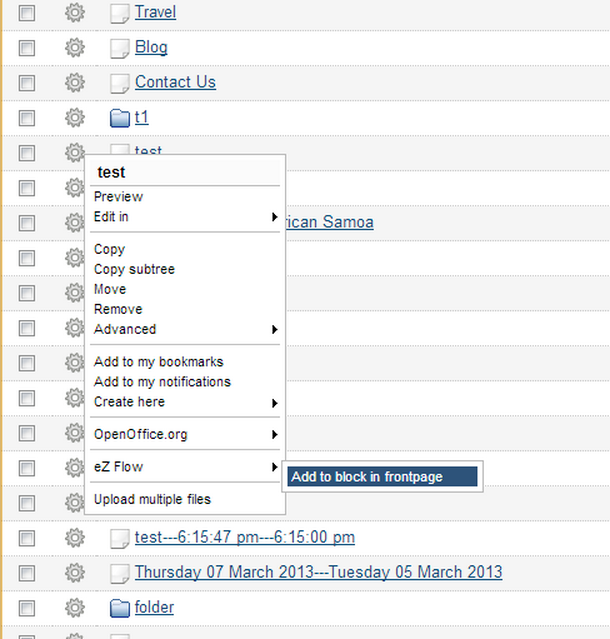
Now, there is another way to add some content to a block, and that is via the pop-up menu in eZ Publish. It looks like this:
You just need to click on the Settings wheel icon in the Sub items menu, position over eZ Flow and click on Add to block in frontpage. You will be lead to a dialog box where you can select a landing page, a zone, and a block in which to put the node in. Both of the ways of adding content to a block are pretty straight-forward and it’s only a matter of preference which one you’ll use.
I hope this made eZ Flow a bit clearer for all of you who haven’t used it yet, and that this article will at least give you the courage to start making sites using eZ Flow.
Until next time, I wish you happy coding,
Tomislav


